
BJJ Positions for Beginners: Guard, Side Control, Mount, and Back Explained
Published · by Elizabethtown BJJ
BJJ positions describe how two grapplers are arranged and who can control the next movement. Start by recognizing five: guard, side control, mount, back control, and turtle. Then ask two questions: What is keeping me here, and what would improve my position? That gives a beginner a useful task even before learning many techniques.
This guide explains basic BJJ positions for supervised sport training. It is a map for understanding class, not a substitute for a coach demonstrating safe movement with a partner. New to the mats? Start here for your first class.
The positional hierarchy: control before submissions
A practical learning sequence is to engage the guard, pass the legs, settle into side control, and progress toward mount or back control. Each stage changes what the defender can use to block movement. In guard, the legs remain a major barrier; after a pass, the top player can control the torso more directly. Mount and back control create further attacking opportunities, but neither is secure without balance and connection.
This is a teaching framework, not a promise that one position always beats another. An experienced guard player may prefer bottom guard to a loose top position. Stephan Kesting's coach-authored A Roadmap for BJJ describes the major positions and the limits of a rigid hierarchy.
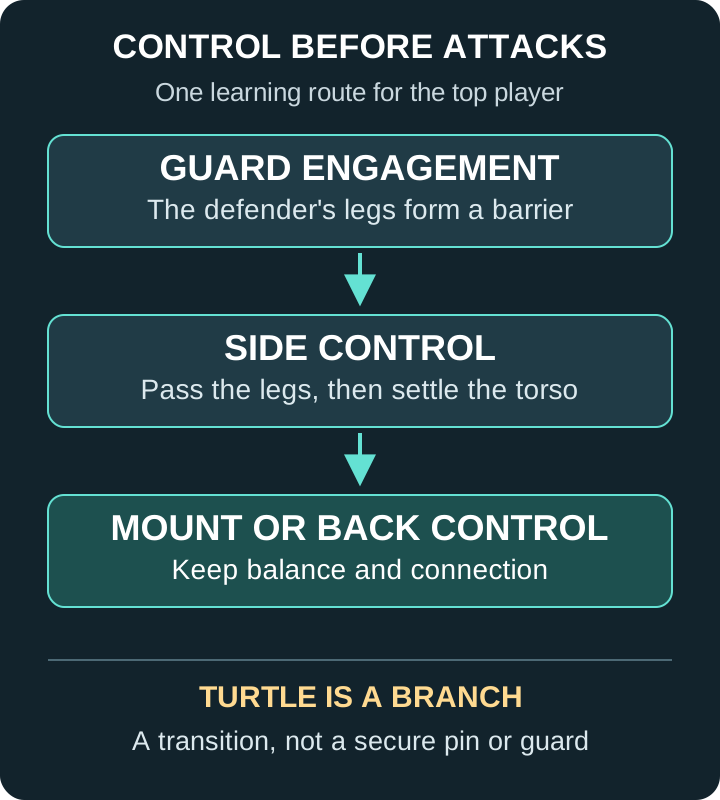
Control comes before submissions because reaching for an attack can free the very space your partner needs to escape. First recognize the position, establish a stable base, and notice the likely escape. A submission is a separate skill to learn under supervision; this guide stays focused on position.
Position and points are also different. Under the IBJJF rules, a qualifying guard pass earns three points, while qualifying mount and back control earn four after the required stabilization. Arriving in side control does not automatically award passing points. A reversal from underneath a pin is not automatically a scoring sweep. Rules vary by event; the diagram is not a scorecard.
Guard: the bottom player's legs are still involved
Recognize it: one person is seated or lying down and uses their legs to manage the person above or in front of them. Closed guard wraps both legs around the partner's waist. Open guard uses changing foot and leg connections. Half guard traps one of the top player's legs. Being on bottom in guard is different from being pinned beneath side control.
Bottom objective: keep useful leg connections, manage distance, and disrupt the top player's balance. Look for a coach-taught sweep to come on top or a safe way to stand. If the passer clears a knee, reconnect before both legs are beaten.
Top objective: maintain posture and balance while clearing the legs, then stabilize a position beyond them. Driving forward without controlling the legs often leaves you stuck inside the same guard.
Common transition: a completed pass can lead to side control. If bottom brings a knee back between the bodies, the exchange can return to guard. Neither player should assume the pass is finished while a leg remains trapped.
Side control: beyond the legs, across the torso
Recognize it: the top player is beside the bottom player's torso, usually chest-to-chest and roughly perpendicular, with the legs cleared. The top player does not have to sit astride the hips as in mount.
Top objective: keep a stable base and control the shoulders and hips without relying on neck pressure. Follow the defender's movement and prevent their knees from reconnecting before advancing.
Bottom objective: make structured space with frames, then move the hips to recover a knee or leg connection. A frame uses a bent arm or shin as a barrier; it is not a straight-arm shove. Kesting's side-control posture guide explains how defensive arm placement supports escape. Learn the exact placement with your coach.
Common transition: top can advance toward mount when the route across the hips opens. Bottom can recover half guard first and then work toward a fuller guard. Recovering one trapped leg is progress even if the escape is unfinished.
Mount: on top, astride the torso
Recognize it: the top player straddles the bottom player's torso while facing their head, with a leg on either side. The bottom player's legs are not between the two torsos as they would be in guard.
Top objective: stay balanced as the defender bridges or turns. Use controlled movement to follow the hips instead of squeezing harder or reaching away from your base.
Bottom objective: protect the neck, keep the elbows close, and create an escape through coordinated movement. A coach may teach an elbow-knee escape toward half guard or a bridge-and-roll reversal when the necessary arm and leg are controlled. Do not treat an uncontrolled explosive bridge as a complete escape.
Common transition: top may follow a turn toward back control. Bottom may regain guard or reverse to top guard. Turning away can expose the back, so ask your coach what you must protect during that movement.
Back control: behind the defender
Recognize it: the controlling player is behind the defender with chest-to-back connection. Arm control often takes a seatbelt shape, with one arm over a shoulder and the other under an armpit. Legs may use inside hooks to help manage the hips.
Here, controlling player and defending player are clearer labels than top and bottom: either person can be closer to the floor while the same back-control relationship remains.
Controlling objective: follow the defender's shoulders and hips while keeping connection. Do not pull or twist the neck to stop an escape.
Defending objective: protect the neck and address the controlling hands before trying to free the hips and bring your shoulders toward the mat. Removing a leg hook alone does not end the position if the upper-body connection remains.
Common transition: a defender who frees the shoulders may turn to face the partner and rebuild guard. The controlling player may switch to mount as that turn occurs. The goal is to recognize the changing relationship, not race through a memorized sequence.
Turtle: a temporary defensive position
Recognize it: the defending player is on knees and elbows or hands, facing the mat, with the partner above or alongside. Turtle can appear during a scramble or an attempt to avoid a pin. It is not the same as an established guard, and it exposes routes to the back.
Top objective: stay balanced and connected while looking for a controlled turnover or back-control entry. Avoid jumping onto the partner, collapsing their neck, or forcing a roll.
Bottom objective: protect the neck and limb openings while working toward guard or a coach-taught return to standing. Remaining curled up is not an escape. Gracie Barra's turtle-to-guard lesson illustrates guard recovery as one possible direction.
Common transition: bottom can rebuild guard; top can follow the hips toward back control. Which route is available depends on grips, space, and balance. Do not roll blindly while your partner is attached.
How the positions connect
A sequence is a possibility, not a requirement. The top player's planned route changes when the defender recovers a leg, turns, or reverses. Use this second diagram to name the next position rather than treating every movement as a submission attempt.
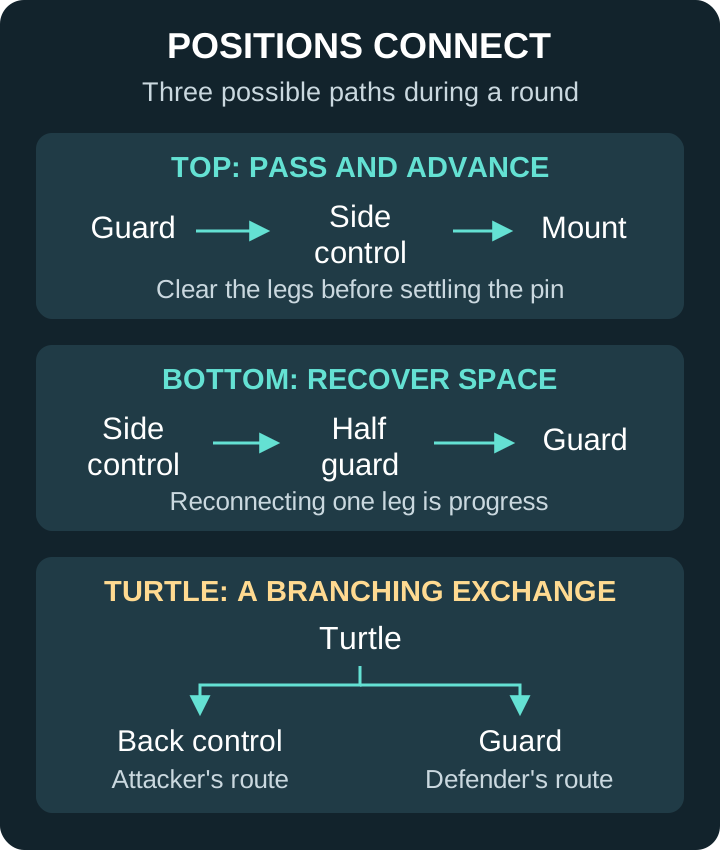
Try describing a round in plain terms: “I was in bottom side control, recovered half guard, and rebuilt guard.” That tells your coach where you made progress and where you need help. It is more useful than judging the entire round by whether someone tapped.
A simple positional training drill
Ask your coach to supervise this example after demonstrating a side-control escape. Kesting's guidance on training intensity includes positional sparring with restricted start and finish conditions. The timing and rules below are an original beginner practice suggestion, not an academy policy.
- Set the position: start in side control with comfortable, coach-approved pressure. Agree that there are no submissions, neck cranks, or explosive movements.
- Give each partner one task: top tries to hold side control; bottom tries to recover half guard or guard using the escape just taught. Begin cooperatively, then add light resistance only with the coach's approval.
- Work for 60 seconds: reset gently whenever bottom regains a leg connection or the position breaks. If top loses balance, pause and reset rather than scramble into a new attack.
- Switch roles: repeat for 60 seconds, then each partner names one thing that helped maintain control or create space. A reset is useful feedback, not a failed round.
Either partner can tap or say “stop” at any time. Release pressure immediately and reset only when both are comfortable. The aim is to learn recognition, balance, and a safe next action.
For your next class, choose one position and identify both players' objectives before the round begins. If you have not started training yet, the beginner starting guide explains how to take the first step.